Sine Wave Generation with "Fast PWM Mode" of AVR - using ATmega16
I had previously shown how to generate sinusoidal pulse width modulation (SPWM) signals using the ECCP module in a PIC for generating a sine wave output for use in DC-AC inverter. I have had requests from people asking how to generate the same SPWM signals with other microcontrollers that don't have the ECCP module, such as the super popular PIC16F877A. And so I had written another article where I showed how to generate sine wave using SPWM with the CCP module of a PIC. This concept, as I had mentioned in that tutorial, can be extended to use for any microcontroller that has a PWM module. And so, I’ve decided to demonstrate how to generate sine wave using SPWM with an Atmel AVR microcontroller.
The microcontroller I’ve chosen is the ATMEGA16. However, the concept can be used on any AVR that has a PWM module. The output sine wave is to have a frequency of 50Hz. I have chosen to use a switching frequency of 16kHz for SPWM.
So, here I talk about how to generate sine wave using sinusoidal pulse width modulation (SPWM) signals using the PWM module as can be commonly found on most Atmel AVR microcontrollers. If you’re curious regarding my previous tutorials that revolved around the Microchip PIC microcontrollers, you should go through the other articles related to generating SPWM to get an idea of what I'm talking about regarding sine wave generation:
So, here I talk about how to generate sine wave using sinusoidal pulse width modulation (SPWM) signals using the PWM module as can be commonly found on most Atmel AVR microcontrollers. If you’re curious regarding my previous tutorials that revolved around the Microchip PIC microcontrollers, you should go through the other articles related to generating SPWM to get an idea of what I'm talking about regarding sine wave generation:
- Generation and Implementation of Sine Wave Table
- Smart Sine - Software to generate sine table
- Generation of sine wave using SPWM in PIC16F684
- Demystifying The Use of Table Pointer in SPWM - Application in Sine Wave Inverter
Now let's move on to sine wave generation using ATMEGA16.
Let’s take a look at the code first:
//----------------------------------------------------------------------------------------
//Programmer: Syed Tahmid Mahbub
//Target Microcontroller: ATMEGA16
//Compiler: mikroC PRO for AVR (Can easily port to any other compiler)
//-----------------------------------------------------------------------------------------
unsigned int sin_table[32]={0, 100, 199, 296, 390, 480, 566, 645, 718,
783, 840, 889, 928, 958, 979, 989, 989, 979, 958, 928, 889, 840, 783,
718, 645, 566, 480, 390, 296, 199, 100,0};
#define MOSA PORTD0_bit
#define MOSB PORTD1_bit
#define MOSC PORTD2_bit
#define MOSD PORTD3_bit
unsigned char FlagReg;
#define Direction FlagReg.B0
//0 -> MOS A + D
//1 -> MOS B + C
unsigned int TBL_POINTER_NEW, TBL_POINTER_OLD, TBL_POINTER_SHIFT, SET_FREQ;
unsigned int TBL_temp;
unsigned char DUTY_CYCLE;
void interrupt() org IVT_ADDR_TIMER1_OVF{
TBL_POINTER_NEW = TBL_POINTER_NEW + SET_FREQ;
if (TBL_POINTER_NEW < TBL_POINTER_OLD){
if (Direction == 0){
MOSA = 0;
MOSD = 0;
MOSB = 1;
MOSC = 1;
Direction = 1;
}
else{
MOSB = 0;
MOSC = 0;
MOSA = 1;
MOSD = 1;
Direction = 0;
}
}
TBL_POINTER_SHIFT = TBL_POINTER_NEW >> 11;
DUTY_CYCLE = TBL_POINTER_SHIFT;
TBL_POINTER_SHIFT = sin_table[DUTY_CYCLE];
OCR1AH = TBL_POINTER_SHIFT >> 8;
OCR1AL = TBL_POINTER_SHIFT & 0x0F;
TBL_POINTER_OLD = TBL_POINTER_NEW;
}
void main() {
SET_FREQ = 410;
TBL_POINTER_SHIFT = 0;
TBL_POINTER_NEW = 0;
TBL_POINTER_OLD = 0;
DUTY_CYCLE = 0;
DDRC = 0xFF;
DDRD = 0XFF;
OCR1AH = 0;
OCR1AL = 0;
TCCR1A = 0x82;
ICR1H = 0x03;
ICR1L = 0xE7;
//ICR1 = 999 -> TOP -> 16kHz
TIMSK = 0x04;
TCCR1B = 0x19;
SREG_I_bit = 1;
while(1);
}
That’s the code. Quite simple really. And pretty short!
This is the circuit diagram of the SPWM signal generation portion:

Fig. 1 - Circuit diagram of SPWM generation section - microcontroller + AND gates (Click image to enlarge)
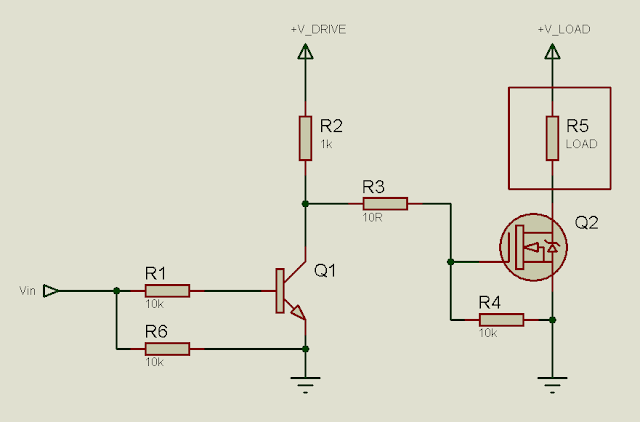
Below (Fig. 2) is the circuit diagram for the configuration of the MOSFETs and the drivers - and the synchronization with the signals generated from Fig. 1 above.

Fig. 2 - MOSFET Configuration Section (Click image to enlarge)
Now let's analyze the code and see what I've done.
Here, I’ve used the Fast PWM mode. I chose to use an oscillator frequency (for ATMEGA16) of 16MHz and an SPWM switching frequency of 16kHz. For this, I selected ICR1 as the TOP and assigned 999 to ICR1. I used a prescaler divider (N) = 1. I used PWM mode 14. So that gives a switching frequency of:

Fig. 3 - Calculating/Verifying switching frequency
In PWM mode 14, ICR1 sets TOP and OCR1 sets the duty cycle.
I’ve assigned 0x82 to TCCR1A and 0x19 to TCCR1B. This sets PWM mode to mode 14. This also sets Compare Output mode for OCR1A to non-inverting mode: Clear OCR1A on compare match, clear at BOTTOM. I have selected the sine table such that the peak value is smaller than TOP. To generate the sine table, I used my software “Smart Sine” with a peak value of 990. Also notice how there’s a zero at the beginning and ending of the sine table. These act to create a “deadtime” so that there isn’t a short circuit due to cross-conduction between the MOSFETs in the same leg being driven. I did this by generating a sine table with 31 values and a peak of 990 and then adding a zero at the end. See Fig. 5 below for demonstration of the deadtime. For my software "Smart Sine", visit this page:
http://electel.blogspot.com/2016/10/smart-sine-software-to-generate-sine.html
http://electel.blogspot.com/2016/10/smart-sine-software-to-generate-sine.html
The SPWM generation is done by the single PWM module and which MOSFETs to send the signals to is set by the "Direction" bit and the hardware trick employing the AND gates. When "Direction" is equal to 0, the high side MOSFET A is kept on for 10ms during which time the SPWM signals on PWM (OC1A) output (PORTD5) are sent to low side MOSFET D by sending a "1" to PORTD3, which, with the help of the AND gate "diverts" the OC1A signal to the low side MOSFET D (see Fig. 1 above). The same thing is achieved when "Direction" is equal to 1, just with high side MOSFET C and low side MOSFET B. When MOSFETs A and D are operated, MOSFETs B and C are kept off and vice versa. For MOSFET drive, we need 4 pins for the 4 drive signals and I’ve chosen PORTD bits 0 to 3. I’ve arbitrarily chosen these four pins but you can choose any four pins really. The MOSFETs are first turned off before the other two are turned on, as can be seen in the code block:
if (Direction == 0){
MOSA = 0;
MOSD = 0;
MOSB = 1;
MOSC = 1;
Direction = 1;
}
else{
MOSB = 0;
MOSC = 0;
MOSA = 1;
MOSD = 1;
Direction = 0;
}
Use of the table pointer in the interrupt:
When Timer/Counter 1 reaches TOP, TOV1 flag is set and since interrupt is enabled, the ISR in the corresponding interrupt vector is served. There table pointer is made use of to retrieve the required values off the sine table and assign them to OCR1AH and OCR1AL – the 16-bit resultant in OCR1A sets the duty cycle. The sine table stores the duty cycle in such a way that when these are subsequently sent to the MOSFETs in the specific order in which they are set, at the required frequency, the output, when filtered, will produce a sine wave.
Every 62.5us the ISR is served – 62.5us because the SPWM frequency was set to 16kHz. Time period for a 16kHz frequency is 62.5us as time period = 1 / freqeuncy.
In the main() function, I had assigned the value of 410 to SET_FREQ. SET_FREQ determines the output frequency of the sine wave, which in our case here is 50Hz. You’ll soon see how.
In the interrupt, the variable TBL_POINTER_NEWis updated – every 62.5us it is increased by 410. TBL_POINTER_NEW is a 16-bit variable and at the beginning of program execution has a value of 0. So, after the first interrupt it holds 410, after the second interrupt 820, after the third 1230 and so on. After 159 interrupts, TBL_POINTER_NEW holds 65190. So, at the next interrupt, TBL_POINTER_NEWoverflows and holds 64.
The interrupt occurs every 62.5us. At each interrupt TBL_POINTER_NEW is increased by 410. At the 160thinterrupt, TBL_POINTER_NEWoverflows, just as it does the 320th interrupt, the 480thinterrupt and so on.
Initially TBL_POINTER_NEW holds 0 and on subsequent interrupts, TBL_POINTER_NEWholds 410, 820, 1230, 1640, 2050, 2460, 2870, 3280, 3690, 4100 and so on.
TBL_POINTER_SHIFTright-shifts TBL_POINTER_NEW eleven times and stores that value. Right shifting 11 times is the same as dividing by 211 (211 = 2048) – just more efficient. When the microcontroller starts up, TBL_POINTER_SHIFTholds 0 and on subsequent interrupts, TBL_POINTER_SHIFTholds 0, 0, 0, 0, 1, 1, 1, 1, 1, 2, 2, 2, 2, 2, 3, 3, 3 ….. and so on. Now, the trend is that TBL_POINTER_SHIFTholds the same value for 5 consecutive interrupts – go on, you can do the math. Why 5 times? We’ll see that a little later.
After TBL_POINTER_NEW is shifted 11 times, DUTY_CYCLE is assigned the resultant 5-bit value. This acts as – or rather is – the table pointer and the required value is retrieved off the sine table. This 16-bit value is then split into two 8-bit values to be assigned to OCR1AH and OCR1AL, thus setting the appropriate duty cycle.
Now let’s see why TBL_POINTER_SHIFT is needed to be incremented every 5 interrupts and how we’ve done that.
Our frequency is 50Hz – time period is 20ms. A half cycle takes 10ms. Recall that the sine table used is only for half a cycle. So, the 32 values must be called such that they make up the half cycle. The interrupt service routine is executed each 62.5us and so, retrieving all the values from the sine table and using them to update the duty cycle takes a total time of 62.5us * 32 = 2000us (assuming each value is retrieved/called once). That’s 2ms. But our half cycle is 10ms – 5 times larger than what we have now. So, we increase the time five folds. How? By calling each value from the table 5 times instead of only once. So, the time involved is now 32 * 62.5us * 5 = 10000us = 10ms.
This calculation we’ve just done is related to the frequency – 50Hz desired frequency and thus 10ms half cycle. I’ve shown this “backward” to explain why this has been chosen but remember that the microcontroller doesn’t know you want 50Hz frequency. The microcontroller doesn’t know that the desired time is 10ms.
So, now you know the answer to why I’ve called each sine table value 5 times: to ensure that the sine table that has 32 values occupies the entire 10ms. Now, how did I make it repeat 5 times? By setting SET_FREQ to 410. You might be wondering how this works. Well, it works this way.
SET_FREQ = 410. Each interrupt, TBL_POINTER_NEW is increased by 410. Every 5 interrupts, TBL_POINTER_NEWis increased by 2050 (compared to the initial value). 211 = 2048. Since TBL_POINTER_SHIFT divides TBL_POINTER_NEW by 2048, when TBL_POINTER_NEW increases 5*410 times, TBL_POINTER_SHIFT increases once. So, the number of repeats (5 in this case) is equal to the number of interrupts it takes for TBL_POINTER_SHIFT to increase by one, which is equal to the number of times it takes for SET_FREQ to equal or cross 211 (=2048). Since SET_FREQ = 410, the number of times to cross 2048 is 5 and that is the number of times each table value is called. So, the table pointer is incremented every 5 interrupts. Thus SET_FREQ determines the frequency. If we had set SET_FREQ to 200, the number of times to cross 2048 would be 11, as 200*10 = 2000 (less than 2048) but 200*11 = 2200 (more than 2048). Thus each sine table value would be called 11 times – the table pointer would be incremented every 11 interrupts. The output time period of the sine wave would then be 2 * 32 * 62.5us * 11 = 44000us = 44ms. The output frequency would thus be 22.7 Hz instead of the 50Hz we have now.
SET_FREQ can be calculated as {65536/ (32 * 5)} = 409.6 = 410 rounded off to the nearest integer. That’s SET_FREQ = [216/{(Number of sine table values) * (Number of times each value is to be called)}].
I’ve talked about SET_FREQ, TBL_POINTER_NEW, TBL_POINTER_SHIFT and right shifting eleven times. Now you may ask why eleven times. Why not 5 or 10 or 12 or any other value? The reason is that we have a sine table with 32 values. 32 = 25. Shifting a 16-bit variable eleven times to the right leaves us with a 5-bit value – one between 0 and 31. These 5 bits are the upper most (most significant) 5 bits. This 5-bit value is the sine table pointer. This works in conjunction with the number of sine table values and the value of SET_FREQ to set or determine the output sine wave frequency. If we had 64 sine table values, we would right-shift TBL_POINTER_NEW10 times instead of 11 so that the shifting operation results in a 6-bit value. 26 = 64 and that is the number of sine table values we have – the table pointer would have a value between 0 and 63.
In the interrupt, after the duty cycle is set, TBL_POINTER_OLD is assigned the value of TBL_POINTER_NEW. When TBL_POINTER_NEWis first assigned 410, TBL_POINTER_OLDholds 0. The 11-bit shifting is done. The duty cycle is set and then TBL_POINTER_OLD is set. So, the TBL_POINTER_OLD update trails TBL_POINTER_NEW update. So, every interrupt until TBL_POINTER_NEWoverflows, TBL_POINTER_NEW is greater than TBL_POINTER_OLD.
When TBL_POINTER_NEW = 64370 and the ISR is to be executed, TBL_POINTER_OLDalso holds 64370. TBL_POINTER_NEW is increased to 64780 and then the sine table value is called and TBL_POINTER_OLD is then updated to 64780. The next interrupt, TBL_POINTER_NEWis increased to 65190 and the “if condition” is again false since at that stage TBL_POINTER_OLD holds 64780 – TBL_POINTER_NEW > TBL_POINTER_OLD. Then at the end of the ISR, TBL_POINTER_OLD is assigned 65190. And now comes the interesting part. TBL_POINTER_NEWnow holds 65190 and TBL_POINTER_OLDholds 65190. 410 is to added to TBL_POINTER_OLDand TBL_POINTER_OLD overflows to hold 64. Now, TBL_POINTER_NEW (which holds 64) is less than TBL_POINTER_OLD(which holds 65190) and the if condition is true. So, the direction of MOSFET drive is reversed. If MOSFETs A and D were driven previously, MOSFETs B and C will now be driven and vice versa. Remember that by sending a logic high to PORTD1 or PORTD3, due to the AND gate, we’re just diverting the OC1 PWM to the required low side MOSFET. Thus 2 MOSFETs are driven with the same signals but in alternate half cycles. By inverting the direction of the full-bridge drive, we are carrying out the next half cycle with the same duty cycle values and sequence, but in the opposite direction – as is necessary (think AC waveform and opposite half cycle). This happens every (32*5 = 160) interrupts – when all the values of the table have each been called 5 times. Since TBL_POINTER_OLD then has a small value again, since it overflowed, TBL_POINTER_SHIFTwill then be equal to 0, meaning that the table pointer has restarted from zero and the SPWM starts over again. So, TBL_POINTER_SHIFT, on subsequent interrupts has the values: 0,0,0,0,1,1,1,1,1,2,2,2,2,2,3,3,3,3,3,………..30,30,30,30,30,31,31,31,31,31,0,0,0,0,0,1,1,1,1,1,……. And so on.
That's about it regarding the code. Now let's take a look at the simulation results.
Here are the simulation results:

Fig. 4 - Generated SPWM Drive Signals (Click image to enlarge)

Fig. 5 - Clear demonstration of the "deadtime" (Click image to enlarge)

Fig. 6 - Simulation results showing signal frequencies (Click image to enlarge)

Fig. 7 - Generated Sine Wave Signal (Click image to enlarge)
And that’s about it. It’s not too difficult once you grab it. It’s a simple short useful program with quite a lot to understand despite its brevity. I hope you've understood how to generate SPWM signals using just a single PWM module of the AVR microcontroller and can now use it for all your applications! Keep in mind that this isn't restricted to only AVRs but can be used for any microcontroller containing one PWM module. Let me know your feedback and comments!


Comments
Post a Comment