Debugging the Bridge: Tips for Successfully Designing (Full / Half) Bridge Circuits
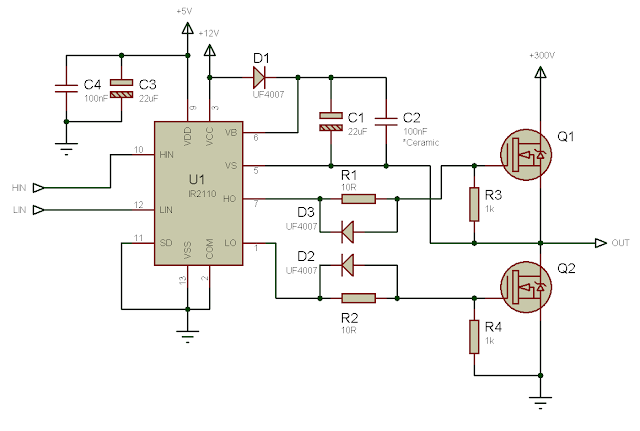
Fig. 1 - A typical high-voltage half-bridge section, using the IR2110 driver (Click image to enlarge)
Fig. 2 - A typical high-voltage full-bridge section, using two IR2110 drivers (Click image to enlarge)
Whenever I get a message or an email or a comment regarding unsuccessful bridge circuits, it’s usually along the lines of no output being observed, the MOSFETs getting hot, or everything just getting damaged or blowing up. When I was in the preliminary stages of bridge design, I also had repeated failures. I had circuits blowing up. I had circuits just not working, no matter what. I’ve written on my blog about one such experience of mine. You can read it here:
http://electel.blogspot.com/2016/10/magic-of-knowledge.html
In this article, I’ll talk about the first things you should do if your attempts at designing a bridge circuit have gone up in smoke or if you’re designing a bridge circuit and want to ensure everything has been done properly.
Another thing I should mention is that, in almost all cases of people asking for help, the bridge driver (the high-low side driver) has been the IR2110 (or similar, such as IR2112, IR2113, etc). Remember that most bootstrap-based high-low side drivers function in pretty much the same way. So, I’ll talk about the driver in general here. I had, however, written a tutorial regarding the IR2110. So, if you're interested regarding that check out:
Using the high-low side driver IR2110 - explanation and plenty of example circuits
Using the high-low side driver IR2110 - explanation and plenty of example circuits
The first thing to do is to check everything over and over again. I know it's cliched and it's probably the most repeated thing you’ve heard, but it's also the least appreciated or followed. One missing connection (or an extra one too, eg a short) could be the cause of all the mayhem.
1) Firstly, check the connection of the bridge itself. Ensure that all the MOSFETs are connected correctly.
2) Check the power connections to the drivers. Make sure that the supply voltage is within acceptable bounds. Ensure that you have small decoupling/bypass capacitors (0.1µF ceramic capacitors) along with larger filter capacitors (for example, 10µF electrolytic capacitors). Use the 0.1µF capacitors across all power lines.
3) Check the connections to the drivers, ie the driving signals coming from the PWM controller, microcontroller, etc. Make sure that the signals for the high-side MOSFET and the low-side MOSFET of one leg of the bridge don’t overlap. If, in any way, both the high-side and low-side MOSFET turn on simultaneously, this will be a dead short-circuit. Expect some ka-boom and smoke. Use an oscilloscope to ensure that the signals don’t overlap.
4) Check the bootstrap circuitry. Make sure you’re using the proper diodes – ultrafast diodes when required. Make sure your bootstrap capacitor is large enough, but not too large. As I had previously mentioned, there is a simple guideline I follow. For low frequencies and high on-times, use large capacitors. 47µF to 68µF could be used for 50Hz/60Hz, for example. For higher frequencies, eg 30kHz, use smaller capacitances, eg 10µF.
5) Check the connections from the drivers to the bridge MOSFETs. Ensure that you’ve placed a series gate resistor between each driver output and MOSFET gate. Ensure that you’ve connected the virtual ground (obtained using the bootstrap capacitor; for example, this is the pin 5 – VS – of the IR2110) to the corresponding high-side MOSFET source. Check that you’ve connected the high-side output of the driver to the high-side MOSFET gate and that you’ve connected the low-side output of the driver to the low-side MOSFET gate.
6) Check that you have placed a gate to source resistor between the gate and source of each MOSFET. I always use a 1kΩ resistor. If you have a number of MOSFETs in parallel, have a gate to source resistor for each MOSFET. Choose the resistance such that the combined resistance is about 1kΩ. For example, if you have three MOSFETs in parallel, for each MOSFET use a 3.3kΩresistor. This will give a combined resistance of 1.1kΩ (you can use 3kΩresistors to get a combined resistance of 1kΩ).
Read here about one of my experiences where I damaged loads of drivers and MOSFETs all due to the lack of gate-to-source resistors:
http://electel.blogspot.com/2016/10/magic-of-knowledge.html
Read here about one of my experiences where I damaged loads of drivers and MOSFETs all due to the lack of gate-to-source resistors:
http://electel.blogspot.com/2016/10/magic-of-knowledge.html
7) Ensure that you have used the same ground for the drivers and the controller generating the drive signals (microcontroller, PWM controller, etc) and the bridge. Most (all that I’ve used) bootstrap-based high-low side drivers are non-isolated drivers. The input and output stage are not isolated from each other. Hence, the driver must share the same ground with both the input stage (which is the microcontroller, PWM controller, etc) and the output stage (which is the bridge that is being driven).
If you have a faulty bridge design and are making changes to it, replacing some components to try again, I suggest you get rid of everything and construct the circuit again using no parts from the old circuit. A faulty MOSFET can damage the driver and vice versa. A faulty driver may damage other parts and so there may be other damaged parts on your circuit that you don’t even know are damaged.
If you follow these tips/hints, you should be able to successfully design bridge drive circuits with no problem. Following these tips/hints will also help you solve problems in any existing bridge drive circuit.


Comments
Post a Comment