I/O Ports Microcontroller 8051
PORT 0 :
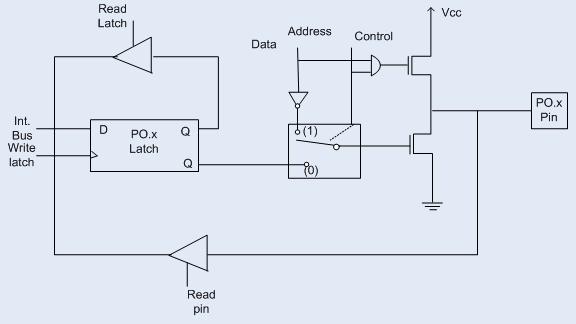
The structure of a Port-0 pin is shown in fig 6.It has 8 pins (P0.0-P0.7).
 |
| Add caption |
Port-0 can be used as a normal bidirectional I/O port or it can be used for address/data interfacing for accessing external memory. When control is '1', the port is used for address/data interfacing. When the control is '0', the port can be used as a bidirectional I/O port.
PORT 0 as an Input Port
Let us assume that control is '0'. When the port is used as an input port, '1' is written to the latch. In this situation both the output MOSFETs are 'off'. Hence the output pin have floats hence whatever data written on pin is directly read by read pin.

PORT 0 as an Output Port
Suppose we want to write 1 on pin of Port 0, a '1' written to the latch which turns 'off' the lower FET while due to '0' control signal upper FET also turns off as shown in fig. above. Here we wants logic '1' on pin but we getting floating value so to convert that floating value into logic '1' we need to connect the pull up resistor parallel to upper FET . This is the reason why we needed to connect pull up resistor to port 0 when we want to initialize port 0 as an output port .

If we want to write '0' on pin of port 0 , when '0' is written to the latch, the pin is pulled down by the lower FET. Hence the output becomes zero.

When the control is '1', address/data bus controls the output driver FETs. If the address/data bus (internal) is '0', the upper FET is 'off' and the lower FET is 'on'. The output becomes '0'. If the address/data bus is '1', the upper FET is 'on' and the lower FET is 'off'. Hence the output is '1'. Hence for normal address/data interfacing (for external memory access) no pull-up resistors are required.Port-0 latch is written to with 1's when used for external memory access.
PORT 1:
The structure of a port-1 pin is shown in fig below.It has 8 pins (P1.1-P1.7) .

Port-1 dedicated only for I/O interfacing. When used as output port, not needed to connect additional pull-up resistor like port 0. It have provided internally pull-up resistor as shown in fig. below. The pin is pulled up or down through internal pull-up when we want to initialize as an output port. To use port-1 as input port, '1' has to be written to the latch. In this input mode when '1' is written to the pin by the external device then it read fine. But when '0' is written to the pin by the external device then the external source must sink current due to internal pull-up. If the external device is not able to sink the current the pin voltage may rise, leading to a possible wrong reading.
PORT 2:
The structure of a port-2 pin is shown in fig. below. It has 8-pins (P2.0-P2.7) .

Port-2 we use for higher external address byte or a normal input/output port. The I/O operation is similar to Port-1. Port-2 latch remains stable when Port-2 pin are used for external memory access. Here again due to internal pull-up there is limited current driving capability.
 Following are the alternate functions of port 3:
 It work as an IO port same like Port 2. only alternate function of port 3 makes its architecture different than other ports.
Port-2 we use for higher external address byte or a normal input/output port. The I/O operation is similar to Port-1. Port-2 latch remains stable when Port-2 pin are used for external memory access. Here again due to internal pull-up there is limited current driving capability.
PORT 3:
Port-3 (P3.0-P3.7) having alternate functions to each pin,The internal structure of a port-3 pin is shown in fig below.


Comments
Post a Comment